Creating a Term Request in the Termbase
To add a submitted term request to the termbase proceed as follows:
- a)
- Highlight the relevant term request in the list.
- b)
- Click "Create in termbase" to add the term request to the termbase immediately, or click "Open" to check the term request.
- ⇨
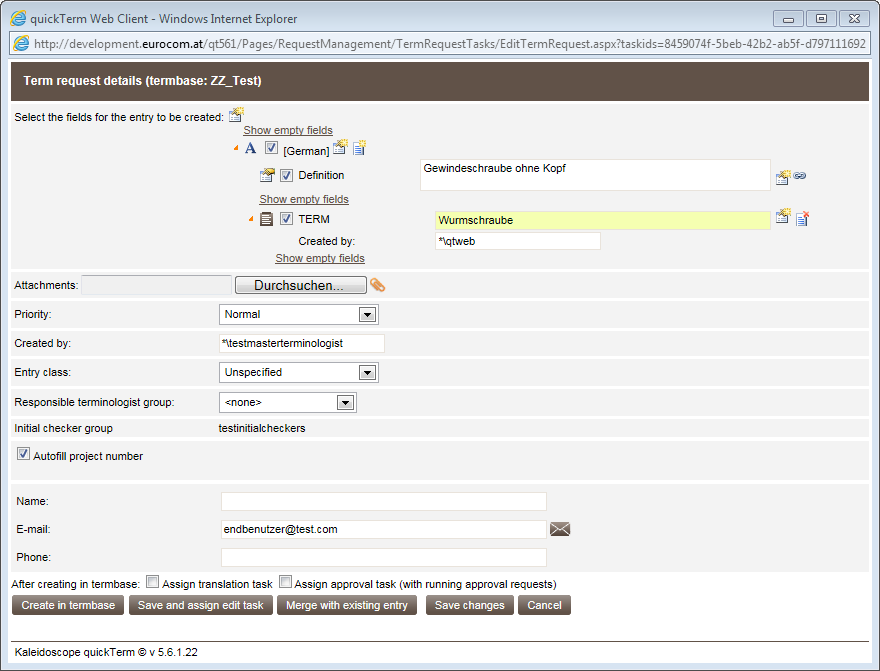
- The term request is shown together with the information entered by the requestor.
- c)
- In the fields list deselect those fields you do not want to add to the termbase.
- d)
- Edit the contents of the completed fields as required.
- e)
- Click "Show not used fields" to show all fields you have access to in the termbase.
- ⇨
- You will now see all fields in the dialog box that you have access to in quickTerm. You can now enter further information here. When adding further information, the box to the left of the relevant field is checked, so that it is taken into consideration when saving.
- f)
- You can also hide these "not used fields" at any time ("Hide fields not used by the requestor").
- g)
- For example, you can expand synonyms for a term request using the "Add new term" button next to the language, or remove terms using the "Remove term" button next to the term.
- h)
- Specify the priority of the term request.
- i)
- "Initial checker group"
This field shows you which initial checker group the term request has been assigned to.
- j)
- "Created by:"
You can replace the original requestor with your user name here.
- k)
- Select the entry class for the termbase (if you use entry classes).
- l)
- "Assigned terminologist group":
If you use more than one terminology groups and a main terminologist group, then you can delegate the term request to another terminologist group.
In Group management, the administrator can use the "Specialization settings" for "Subject area" (values for the filtering field, managed languages) to permanently delegate or assign requests to other terminologist groups. This creates an automatic link in the term request between the terminologist group and subject area. If you change the terminologist group, then this will also change the related field value in the termbase entry. If there is no single value associated with the new terminologist group, then you can choose the value in a popup. If you change the value of the filtering field, the terminologist group responsible will be automatically be changed. The term request is then given the status "Transferring" until the terminologist responsible accepts the term request, whereupon the status reverts to "In progress" again. If e-mail notification is active, the terminologists receive a message about this state change, too.
- m)
- "Custom field:"
Here you can enter a relevant value.
- n)
- Check that attachments were also sent. These cannot be created directly in the termbase from quickTerm. However, the attachments can be downloaded and then uploaded manually to the termbase.
- o)
- Click "Create in termbase".
- ⇨
- The entry is created in the termbase and the entry ID is displayed.
- ⇨
- The entry ID for this entry is now shown in the list of term requests next to a red checkmark.
"Term request" dialog
Merging with an Existing Termbase Entry
If you want to merge the term request with an existing entry, click on "Merge with existing entry". This will open a window where you can log the target entry ID and perform a search. This target entry – if available – is then shown at the bottom of the window.
You can now define what should happen with any fields that are already available (at entry and language level) in the target entry:
- ▪
- "Overwrite existing"
- Overwrites existing fields in the termbase with the contents of the term request. Non-multiple picklist fields (this means that only one value in the list can be selected) are always overwritten, i.e., the new field value always "wins".
- ▪
- "Keep existing"
- Retains the existing fields in the termbase. The fields in the term request that are already available are rejected.
- ▪
- "Merge with existing"
- For picklist fields the sum of all values is written to the field. For text fields both sets of contents are written to their own field (i.e., two fields are created).
You can also use the "Add new fields" checkbox to specify whether additional fields (i.e., fields that exist in the term request, but do not yet exist in the termbase entry) should or should not be added. For non-multiple text fields, the text is always attached to the original contents separated by a semicolon.
When you click on "Merge" the option you selected is implemented.
Saving an entry
If you have finished editing an entry, but do not yet want to create it in the termbase, simply click on "Save changes". This saves the changes to the term request without creating an entry in the termbase.


