Approving a Translation Suggestion
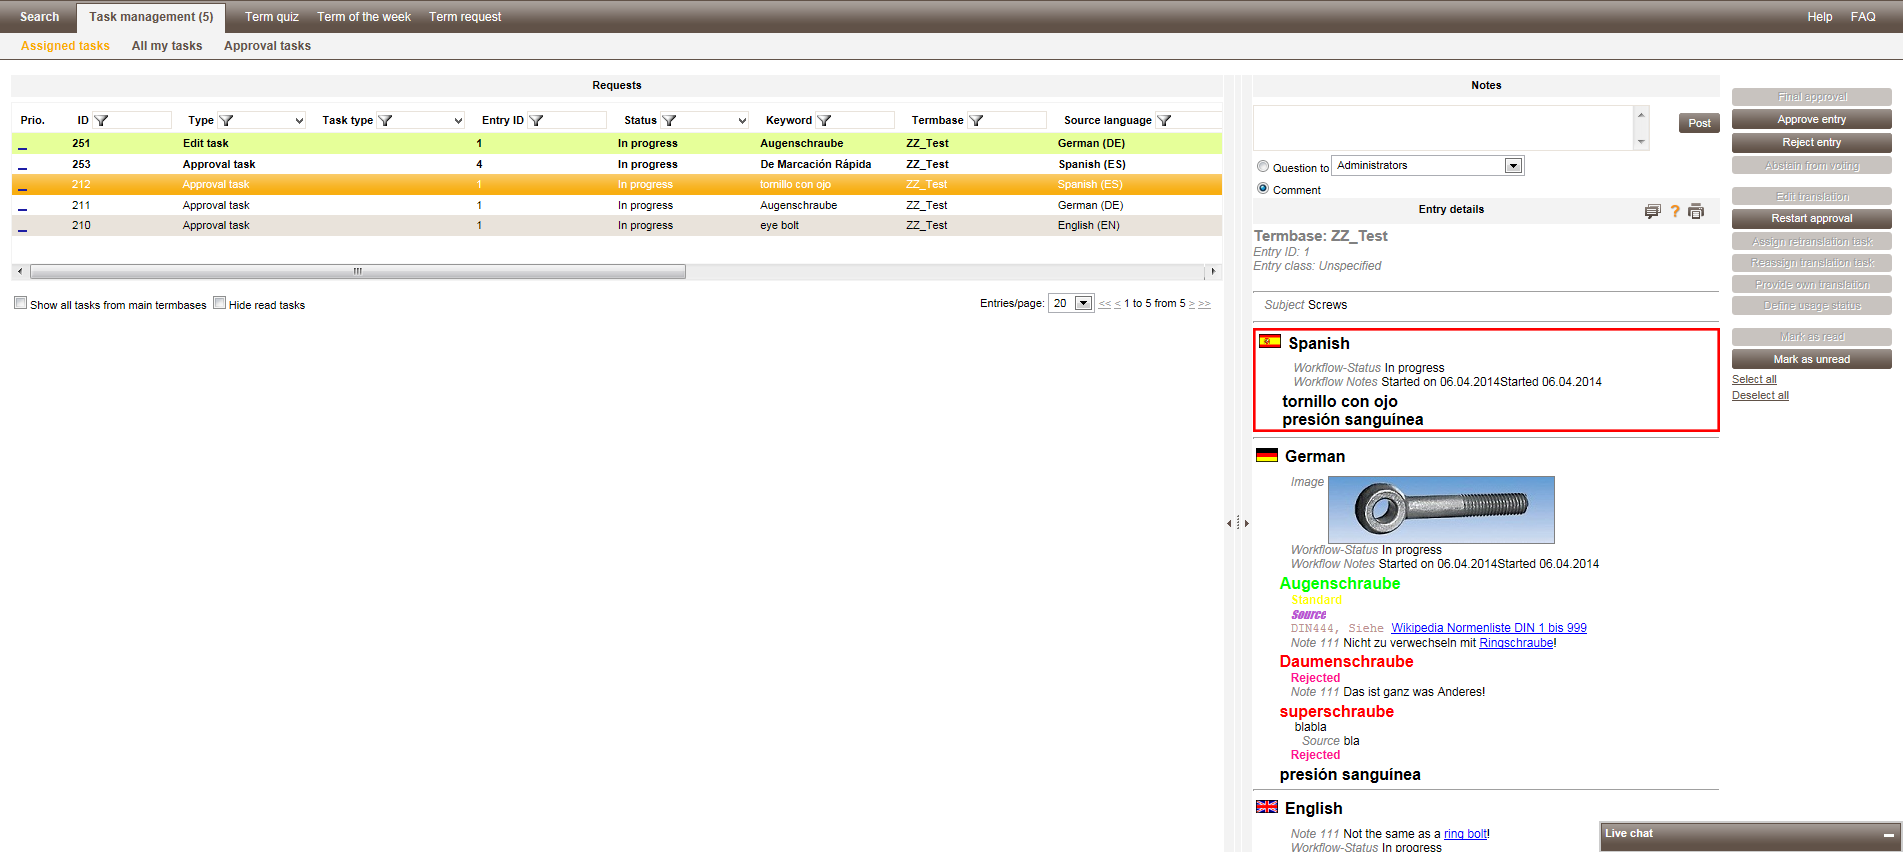
Switch to your Request management screen. Here you will see all tasks that are currently assigned to you. You can find a detailed list of approval tasks on the Approval tasks tab. These are the same tasks, but shown in more detail.
Click on a row to look at the respective task. Next to the list you can then display the entry itself as well as any comments that might have been added to it.
Dialog "Approval tasks"
"Read" and "unread" tasks
In all task lists, the buttons "Mark as read" and "Mark as unread" are available. Depending on the current task, one of these is always greyed out. Unread tasks are always displayed in bold, like in Outlook. By clicking the respective button, you can change the state.
A task is automatically changed to "read" when you select it in the list. With the "Hide read tasks" option you can hide the read tasks and only display the unread ones.
Sorting and filtering lists
The overview list can be sorted by clicking on the header of the respective column. This setting will be saved for the next time you open the list. There is a small icon in the header of each column that indicates whether the table is sorted in ascending or descending order. By clicking on the icon again, you can change the sort order.
You can also filter this list in several different ways:
- 1.
- Enter a part of the content you want to filter on. The list will then only display those entries that contain the letters entered in the filter box.
- 2.
- For columns containing default content (e.g., status) you can also select one or more options from a pre-defined list.
- 3.
- By activating the check boxes underneath the lists (if applicable):
- –
- “Show all tasks from main termbases” (Only available for terminologists)
- By default, only those tasks are displayed in the task list which are currently assigned to the group of the currently logged in user. If you select this option, then you will see all tasks of the respective task type of all termbases for which you are a main terminologist.
- –
- “Hide already closed tasks”
- By selecting this option, you can hide closed tasks from the current list.
- –
- “Hide read tasks”
- By selecting this option, you can hide all those tasks from the current list which you have displayed already.
Filtering the list of tasks
You can also see the following information on the Approval tasks tab:
- ▪
- A checkmark, cross or minus symbol shows you which groups have already approved (green checkmark) or rejected (red crossed out box) which entries, and those that have abstained from voting.
- ▪
- You can "expand" an approval request by clicking on the plus symbol. This shows you all other colleagues in the approval group and their votes. You can thus check what your colleagues voted and who voted for or against the entry. The first checkbox in an expanded group, or the only checkbox in a collapsed group shows you the status of the entire group. For instance, if a set number of voters in a voting approval group have approved or rejected an entry, it will get a green or a red checkmark.
- ▪
- When you select the "Expand all" option at the bottom of the screen this is equivalent to checking every plus symbol for every approval task. When you remove the checkmark, all the approval processes will be collapsed.
- ▪
- By clicking on "Show time stamp" underneath the list, you can display the actual time and date when each approver cast his vote.
- ▪
- You can also click directly in the various checkboxes next to your own approver user in order to approve an entry. Each click changes the approval state to the next possible state. To avoid accidental changes, you must still click on the small floppy disk icon on the far left to save the change.
Approving an Entry
On the right-hand side of the screen, you will see the details relating to the highlighted entry. You can also see comments from your colleagues at the bottom.
You can add new comments or make subsequent changes to your own comments. The terminologist can also see these comments and, if applicable, respond to information requests. You can also send targeted questions to individual groups.
You can copy the comment text in quickTerm Client (place the cursor in the comments area and right-click).
This is how you approve or reject an entry:
- a)
- Select the entry from the list on the left.
- b)
- Click on "Approve entry" to approve an entry
- OR -
Click on "Reject entry" to reject it. Particularly in the latter case, you also need to indicate the reason for rejecting the entry, so your colleagues or the terminologist can adapt it accordingly.
- OR -
Click on "Abstain from voting" if you do not or cannot approve or reject the entry. When you abstain from voting, you should also leave a comment for the terminologist to understand why you did that.
The entry is now approved, not approved or edited. If you have not approved the entry and your colleagues are in agreement with you, the terminologist will revise the entry and resubmit it to you for approval.


