Term request
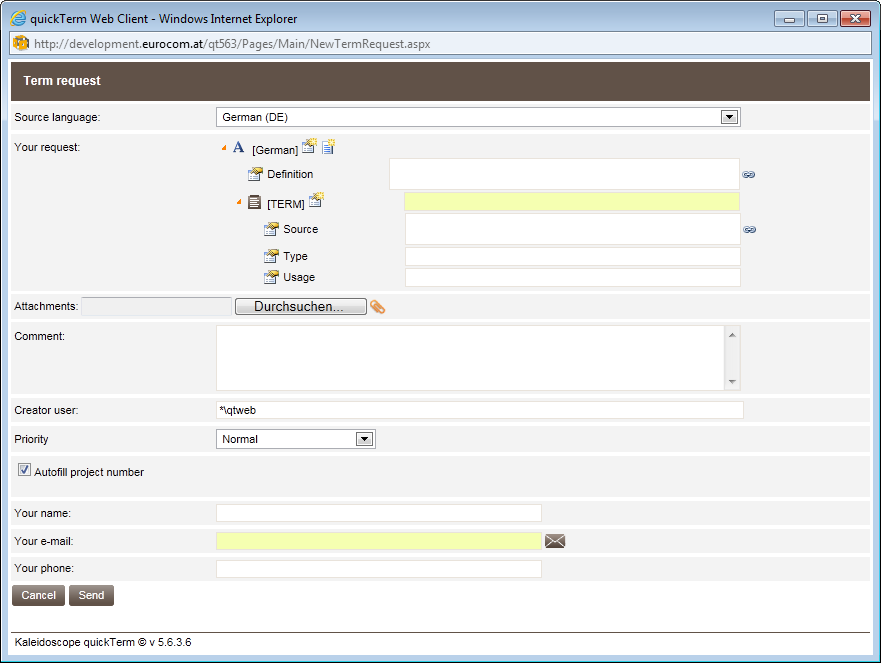
The "Term request" dialog box may look different for different users, since the administrator can specify which information the individual users may or must enter. If you are adding a large amount of information for a term request and you want to expand the dialog box to get a clearer view, you can do this using the mouse pointer in the bottom right corner.
"Term request" dialog
To request a term, proceed as follows:
- a)
- Click on "Request a term".
- ⇨
- The "Request a term" dialog opens.
- b)
- If you have several termbases available, select the termbase for which the request is being made.
- c)
- Select the desired source language.
- d)
- If you are authorized to make multilingual term requests, you can switch to a bilingual term request by checking the Bilingual request box. In this case, you have the option to specify a source and target language.
- e)
- "Comment"
This field lets you add a comment to your term request. This is not stored in the termbase but provides the terminologist with additional information when processing the request.
- f)
- If the term request is in response to an unsuccessful search, the term is automatically entered here. However, this will only work if the search screen and term request source languages are identical.
- g)
- Enter the required information in the available fields under "Your request". Ask you terminologist about the meaning of the available fields.
Some fields are text fields, meaning you can enter any text.
However, other fields provide a drop-down list, because there are only a limited number of possible values. Depending on the configuration, the values can also appear in a tree structure, allowing you to collapse and expand branches and select any sub-node in the tree.
Other fields may appear with a hyperlink icon , which means you can save links here. The hyperlink icons – as well as the Add new term
  and Remove term buttons
  – can be enabled or disabled by the client administrator for each user group using the Enable advanced editor features setting. When you click on the hyperlink icon, a separate screen "Edit cross-links" opens. In this screen you can insert the text for three types of hyperlinks: to another term, to another entry, and to an external object (with http://...).
Mandatory fields are highlighted in yellow, and read-only fields are highlighted in gray.
Finally, if you are working with Acrolinx as the terminology type, you have the option of saving images and attachments not only in quickTerm, but also in Acrolinx. This is only possible for fields defined as "Multimedia". Click on the "Browse" icon next to a field of this type and select a PDF document. This is then shown as an attachment next to a disk icon at the bottom and can only be removed from the relevant field, if required, using the delete icon. An example of this is shown in the above "Term request dialog box" screenshot.
- h)
- Name, E-mail and Custom notification phone:
These three fields help to identify anonymous end users so they can be sent notifications (by e-mail or telephone). They can be defined as mandatory fields in the General Group Settings for end users. If the user enters an e-mail address here, then quickTerm can notify this user via e-mail about what happens to the term request.
- i)
- Auto-fill:
A Customization field can be defined in server management in the Termbase Settings. Check this box if you want this field to be autofilled in the term request; otherwise you can add this information manually. These details can be obtained from your terminologist.
- j)
- Creator user:
Depending on how your internal processes are defined, you have the option to enter your name here so that the terminologist will know who the term request came from, and so that you can continue to use the MultiTerm entry as "Creator". This can also be disabled in Administration.
- k)
- Priority
You can assign three different priority levels to your request: "low" - "normal" - "high". These symbols are shown in the term request lists in the left-hand column. The priority is linked to internal processes and can also be linked to e-mail notifications.
- l)
- Click on the orange paper clip to attach a file to the term request.
- ⇨
- The file is added. To attach further files click on the paper clip again. To remove files that have been added, click on the "x" symbol that appears in front of each file.
- a)
- Click on "Send".
- ⇨
- The terminologist receives an email and can process the request in his/her request management. When the terminologist closes the request, you are notified by e-mail with an explanation of what happened to your request.
Multiple requests warning
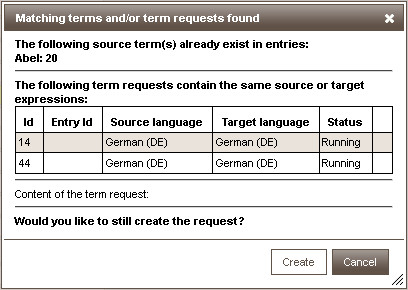
When a new term request is submitted, quickTerm checks whether this term request:
- ▪
- Already exists as an entry in the termbase
- ▪
- Already exists as a currently pending term request
- ▪
- Already exists as a rejected term request
This information is passed to the user, who can then still create the request, if he wants.
"Matching terms and/or term requests found" dialog
Further information


